OpenMM官方文档中文翻译版
正在翻译中
OpenMM User’s Manual and Theory Guide — OpenMM User Guide 7.7 documentation
当前进度: Part II 已全部翻译完成
Introduction
OpenMM 是一个用于分子模拟的工具包。它既可以用作运行模拟的独立应用程序,也可以用作您从自己的代码调用的库。它提供了极大的灵活性(通过自定义力和积分器)、开放性和高性能(尤其是 GPU )的组合,使其在仿真代码中真正独一无二。
OpenMM包含两个部分:
- 库文件,可以轻松将分子模拟功能添加到程序中
- 单纯使用分子模拟功能
Install
OpenMM可以通过conda安装
1 | conda install -c conda-forge openmm |
检查是否安装成功
1 | python -m openmm.testInstallation |
Usage
Simple example
- 首先导入pdb文件构建生物大分子体系
- 使用Amber14力场和TIP3P-FB水模型生成top
- 能量最小化
- 条件 10000步 Langevin积分 每1000步保存一次帧
1 | # python simulatePDB.py |
1 | python simulatePDB.py |
使用AMBER文件
OpenMM可以使用不同的方式建立体系。我们可以输入PDB文件并选择力场进行模拟。也可以使用Ambertools构建体系。你只需要提供prmtop和inpcrd文件给OpenMM。
1 | # Example |
Note:
AmberPrmtopFile仅支持Amber 7以后的格式- 文件名必须使用单引号
- 对于周期性体系,
prmtop文件指定周期性盒子大小。但是inpcrd文件中也指定了盒子尺寸- 如果使用
barostat恒温积分器进行平衡,盒子尺寸会时刻改变。可以使用setPeriodicBoxVectors()指定使用的盒子尺寸
使用Gromacs文件
OpenMM也可以使用Gromacs文件,即提供top和gro文件
1 | from openmm.app import * |
Note:
- 使用top文件时,需要指定两个额外选项
- 指定盒子尺寸
periodicBoxVectors=gro.getPeriodicBoxVectors()gromacs top只储存坐标- 指定Gromacs top文件所在文件夹。
使用CHARMM文件
1 | from openmm.app import * |
OpenMM-Setup
OpenMM-setup 是一个图形化界面,能够快速构建输入文件。
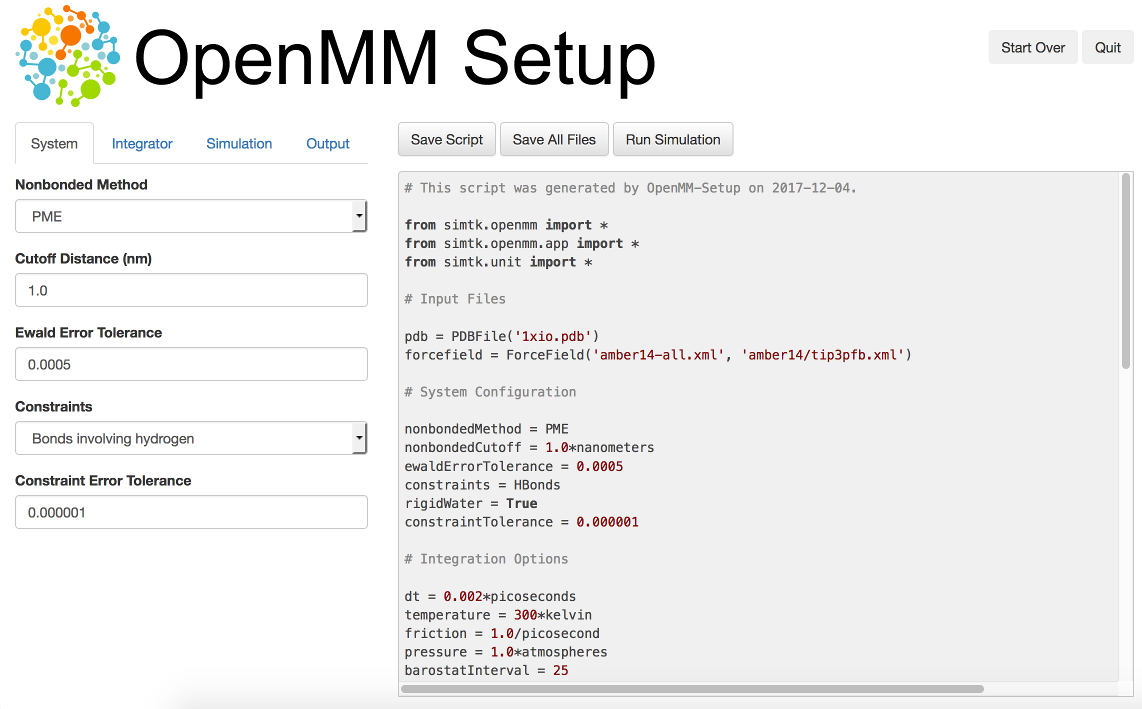
安装:conda install -c conda-forge openmm-setup
使用: openmm-setup
设置模拟参数
运行平台
four platforms:
- Reference
- CPU
- CUDA
- OpenCL
OpenMM 有三种方法选择平台
-
OpenMM会自动选择
-
设置环境变量
OPENMM_DEFAULT_PLATFORM,会覆盖默认 -
在脚本中指定
1
2
3
# 使用cuda
platform = Platform.getPlatformByName('CUDA')
simulation = Simulation(prmtop.topology, system, integrator, platform)1
2
3
4# 指定使用平台的属性
platform = Platform.getPlatformByName('CUDA')
properties = {'DeviceIndex': '0,1', 'Precision': 'double'}
simulation = Simulation(prmtop.topology, system, integrator, platform, properties)
力场
当您创建一个力场时,您指定一个或多个 XML 文件来加载力场定义。大多数情况下,将有一个文件来定义主力场,可能还有第二个文件来定义水模型(隐式或显式)。例如:
1 | forcefield = ForceField('amber14-all.xml', 'amber14/tip3pfb.xml') |
在某些情况下,一个 XML 文件可能会加载其他几个文件。例如,amber14-all.xml 实际上只是加载几个不同文件的快捷方式,这些文件共同构成 AMBER14 力场。如果您需要更精细地控制加载哪些参数,您可以单独指定组件文件。
请注意,某些力场和水模型包含“额外粒子”,例如孤对粒子或 Drude 粒子。示例包括 CHARMM 极化力场和所有 4 和 5 站点水模型。要使用这些力场,您必须首先将额外的粒子添加到拓扑中。有关详细信息,请参阅第 4.4 节。
下面描述的力场是OpenMM内含的。其他力场可在 https://github.com/choderalab/openmm-forcefields 在线获得
Amber14
| File | Parameters |
|---|---|
amber14/protein.ff14SB.xml |
Protein (recommended) |
amber14/protein.ff15ipq.xml |
Protein (alternative) |
amber14/DNA.OL15.xml |
DNA (recommended) |
amber14/DNA.bsc1.xml |
DNA (alternative) |
amber14/RNA.OL3.xml |
RNA |
amber14/lipid17.xml |
Lipid |
amber14/GLYCAM_06j-1.xml |
Carbohydrates and glycosylated proteins |
amber14/tip3p.xml |
TIP3P water modeland ions |
amber14/tip3pfb.xml |
TIP3P-FB water modeland ions |
amber14/tip4pew.xml |
TIP4P-Ew water model and ions |
amber14/tip4pfb.xml |
TIP4P-FB water model and ions |
amber14/spce.xml |
SPC/E water model and ions |
方便起见,amber14-all.xml包含了amber14/protein.ff14SB.xml, amber14/DNA.OL15.xml, amber14/RNA.OL3.xml, and amber14/lipid17.xml
大多数情况下,导入以下两个文件即可
1 | forcefield = ForceField('amber14-all.xml', 'amber14/tip3pfb.xml') |
GLYCAM 因为其太大了,所以默认没有包含。如果体系包含carbohydrates,使用如下命令:
1 | forcefield = ForceField('amber14-all.xml', 'amber14/tip3pfb.xml', 'amber14/GLYCAM_06j-1.xml') |
CHARMM36
| File | Parameters |
|---|---|
charmm36.xml |
Protein, DNA, RNA, lipids, carbohydrates, and small molecules |
charmm36/water.xml |
Default CHARMM water model (a modified version of TIP3P) and ions |
charmm36/spce.xml |
SPC/E water model and ions |
charmm36/tip3p-pme-b.xml |
TIP3P-PME-B water model and ions |
charmm36/tip3p-pme-f.xml |
TIP3P-PME-F water model and ions |
charmm36/tip4pew.xml |
TIP4P-Ew water model and ions |
charmm36/tip4p2005.xml |
TIP4P-2005 water model and ions |
charmm36/tip5p.xml |
TIP5P water model and ions |
charmm36/tip5pew.xml |
TIP5P-Ew water model and ions |
Implicit Solvent
上述 Amber 和 CHARMM 力场可以与 AMBER 的任何Generalized Born implicit solvent models一起使用。要使用它们,请在创建 ForceField 时包含一个额外的文件。
1 | forcefield = ForceField('amber14-all.xml', 'implicit/gbn2.xml') |
| File | Implicit Solvent Model |
|---|---|
implicit/hct.xml |
Hawkins-Cramer-Truhlar GBSA model[13] (corresponds to igb=1 in AMBER) |
implicit/obc1.xml |
Onufriev-Bashford-Case GBSA model[14] using the GBOBCI parameters (corresponds to igb=2 in AMBER). |
implicit/obc2.xml |
Onufriev-Bashford-Case GBSA model[14] using the GBOBCII parameters (corresponds to igb=5 in AMBER). |
implicit/gbn.xml |
GBn solvation model[15] (corresponds to igb=7 in AMBER). |
implicit/gbn2.xml |
GBn2 solvation model[16] (corresponds to igb=8 in AMBER). |
AMOEBA
The AMOEBA polarizable force field provides parameters for proteins, nucleic acids, water, and ions.
| File | Parameters |
|---|---|
amoeba2018.xml |
AMOEBA 2018[18] |
amoeba2018_gk.xml |
Generalized Kirkwood solvation model[19] for use with AMOEBA 2018 force field |
amoeba2013.xml |
AMOEBA 2013. This force field is deprecated. It is recommended to use AMOEBA 2018 instead. |
amoeba2013_gk.xml |
Generalized Kirkwood solvation model for use with AMOEBA 2013 force field |
amoeba2009.xml |
AMOEBA 2009[20]. This force field is deprecated. It is recommended to use AMOEBA 2018 instead. |
amoeba2009_gk.xml |
Generalized Kirkwood solvation model for use with AMOEBA 2009 force field |
水模型
| File | Water Model |
|---|---|
tip3p.xml |
TIP3P water model |
tip3pfb.xml |
TIP3P-FB water model |
tip4pew.xml |
TIP4P-Ew water model |
tip4pfb.xml |
TIP4P-FB water model |
tip5p.xml |
TIP5P water model |
spce.xml |
SPC/E water model |
swm4ndp.xml |
SWM4-NDP water model |
小分子参数
如果体系包含小分子,需要手动生成小分子参数
小分子残基模板生成器
使用openmmforcefield生成残基参数
1 | conda install -c conda-forge openmmforcefields |
你可以使用以下命令生成小分子参数
1 | # Create an OpenFF Molecule object for benzene from SMILES |
也可以使用gaff力场
1 | # Create an OpenFF Molecule object for benzene from SMILES |
使用SystemGenerator管理力场
1 | # Define the keyword arguments to feed to ForceField |
建立与修改模型
在获得一个蛋白pdb文件之后,模拟之前。你需要对pdb文件进行一些修改。1. 加氢(原始pdb文件中可能不带有氢原子)。 2. 显式水模型进行模拟,需要添加水分子 3. pdb文件内包含一些错误的水分子相互作用(与使用的水模型不符)
对于以上修改,可以使用topol和原子坐标创建Modeller类,然后调用不同的建模函数。操作将会创建一个新的topol以及位置坐标,可以提取他们并用于模拟。
1 | pdb = PDBFile('input.pdb') |
加氢
addHydrogens()添加缺失的氢原子
modeller.addHydrogens(forcefield)
此方法需要指定力场来判断添加氢原子的位置。如果体系已经包含一些氢原子,Modeller将会自动识别存在的氢原子并判断需要加氢的原子。一些残基有不同的质子化状态。因此默认体系pH=7,但是可以人为指定pH值:
1 | modeller.addHydrogens(forcefield,pH=5.0) |
对于每个残基,将会选择在指定pH值时最常见的质子化状态。
对于半胱氨酸,也会检查残基是否参与了二硫键。
组氨酸有两个质子化状态。在中性pH时,其出现几率相同。此时判断规则为是否能够形成更加稳定的氢键。
另一方面,可以指定残基得质子化状态。
默认情况下,Modeller导入标准氨基酸和核酸的氢原子信息。可以调用loadHydrogenDefinitions()导入其他类型分子的定义。特别的,如果体系包含碳水化合物并计划使用糖力场
1 | Modeller.loadHydrogenDefinitions('glycam-hydrogens.xml') |
添加溶剂
调用addSolvent()创建包含水和离子的盒子模型
1 | modeller.addSolvent(forcefield) |
此命令创建一个盒子包含水、溶质、离子。水分布在溶质周围,同时确保水分子与溶质之间的距离不会超过范德华半径。同时也添加正负离子中和体系。
addSolvent()首先读取pdb文件中的周期性盒子信息,并设为水盒子大小。未包含盒子信息或者使用不同的盒子信息,可以使用如下命令指定:
1 | modeller.addSolvent(forcefield, boxSize=Vec3(5.0, 3.5, 3.5)*nanometers) |
对于非长方形盒子,可以指定盒子的三维向量
1 | modeller.addSolvent(forcefield, boxVectors=(avec, bvec, cvec)) |
也可以指定距离盒子边界的距离
1 | modeller.addSolvent(forcefield, padding=1.0*nanometers) |
指定添加水分子个数
1 | modeller.addSolvent(forcefield, numAdded=5000) |
指定水模型(default: TIP3P) ['tip3p', 'tip3pfb', 'spce', 'tip4pew', 'tip4pfb', and 'tip5p'. ] (单引号)
1 | modeller.addSolvent(forcefield, model='tip5p') |
添加额外的离子对以设置离子强度
1 | modeller.addSolvent(forcefield, ionicStrength=0.1*molar) |
以离子强度为0.1 molar 的盐溶液溶剂化体系。不用考虑我们用于中和的离子。在此假设这些中和离子与溶质结合并且不会对体系离子强度做贡献。
默认情况下,使用 Na+和Cl-。也可以使用positiveIon [‘Cs+’, ‘K+’, ‘Li+’, ‘Na+’, and ‘Rb+’] 和negativeIon [‘Cl-’, ‘Br-’, ‘F-’, and ‘I-’] 指定
1 | modeller.addSolvent(forcefield, ionicStrength=0.1*molar, positiveIon='K+') |
添加膜
如果模拟膜蛋白,需要创建膜。可以调用addMembrane()
当调用addMembrane()时,会自动添加溶剂,离子。因此不需要调用addSolvent()
确保脂质头部被充分溶剂化。举例,创建POPC膜,与边界1nm距离
1 | modeller.addMembrane(forcefield, lipidType='POPC', minimumPadding=1*nanometer) |
膜被摆放在XY平面,体系中的蛋白默认已经旋转并摆放正确。
推荐使用 Orientations of Proteins in Membranes数据库中的模型。
addMembrane()命令中的参数有很多跟addSolvent()相似。
添加或移除粒子
1 | modeller.addExtraParticles(forcefield) |
"Extra particles"为非普通原子。这包括水模型中使用的虚拟位点。如果使用包含额外粒子的力场,必须添加进topol中。 此命令将会根据力场修改残基
移除水
移除体系中的所有水
1 | modeller.deleteWater() |
保存结果
当处理好体系之后,topol和原子坐标可以用作模拟的输入。
以下命令:导入pdb、加氢、创建溶剂盒子、执行em,保存结果
1 | from openmm.app import * |
模拟进阶
模拟退火
以每次3k得温度差将温度从300k 降到0K,每个温度运行1000步长
1 | simulation.context.setPositions(pdb.positions) |
对粒子使用额外力:a Spherical Container
此例,模拟非周期性球形体系,半径 2 nm。
对每个粒子实际啊一个简谐势
$$
E®=
\begin{cases}
0&&r\le2 \
100(r-2)^2&& r\gt2
\end{cases}
$$
r: 粒子距离初始位置距离 nm
使用CustomExternalForce类。此类对体系中的粒子施加力,能量是粒子得位置函数。
1 | system=forcefield.createSystem(pdb.topology,nonbondedMethod=CutoffNonPeriodic,nonbondedCutoff=1*nanometer,costraints=None) |
步骤:
- 创建
CustomExternalForce对象并加入系统(该对象是数学表达式指定每个粒子得势能)。限制,拉升力,剪切力都能应用于此方法 - 指定施加力的粒子。
注意:当施加力给体系时,必须在创建模拟之前。
提取/报告力
OpenMM可以提供PDB,PDBx/mmCIF和DCD格式的输出。只会储存坐标而非速度,力或其他数据。
可以创建新的报告器输出力(1. 写入报告器2. 查找力)
1 | # ForceReporter 类 |
The constructor and destructor are straightforward. The arguments to the constructor are the output filename and the interval (in time steps) at which it should generate reports. It opens the output file for writing and records the reporting interval. The destructor closes the file.
We then have two methods that every reporter must implement: describeNextReport() and report(). A Simulation object periodically calls describeNextReport() on each of its reporters to find out when that reporter will next generate a report, and what information will be needed to generate it. The return value should be a six element tuple, whose elements are as follows:
- The number of time steps until the next report. We calculate this as (report interval)-(current step)%(report interval). For example, if we want a report every 100 steps and the simulation is currently on step 530, we will return 100-(530%100) = 70.
- Whether the next report will need particle positions.
- Whether the next report will need particle velocities.
- Whether the next report will need forces.
- Whether the next report will need energies.
- Whether the positions should be wrapped to the periodic box. If None, it will automatically decide whether to wrap positions based on whether the System uses periodic boundary conditions.
When the time comes for the next scheduled report, the Simulation calls report() to generate the report. The arguments are the Simulation object, and a State that is guaranteed to contain all the information that was requested by describeNextReport(). A State object contains a snapshot of information about the simulation, such as forces or particle positions. We call getForces() to retrieve the forces and convert them to the units we want to output (kJ/mole/nm). Then we loop over each value and write it to the file. To keep the example simple, we just print the values in text format, one line per particle. In a real program, you might choose a different output format.
1 | simulation.reporters.append(ForceReporter('force.txt',100)) |
计算能量
如果我们已经创建了体系和模拟,我们可以计算能量
1 | import os |
构建力场
openmm使用简单的XML文件格式描述力场参数。内置了很多常见的力场,也可以自己构建力场。力场可以像使用灵活的自定义force classes一样,使用所有的标准OpenMM force classes。甚至可以扩展ForceField类,以增加对全新力的支持,例如插件中定义的力。这使其成为力场开发的强大工具。
基本概念
原子类型和原子类
基于原子类型,力场参数被绑定到原子上。原子类型是对原子的准确识别。仅当力场以相同的方式对待这两个原子时,他们才具有相同的类型。
多个原子类型可以归类为原子类。总的说来,如果力场以相同的方式对待它们,则两种类型应在同一类中。举个例子,丙氨酸的$\alpha$ 碳 和亮氨酸的$\alpha$ 碳 原子类型不同,但是他们同属于一个原子类。
所有的力场参数都可以被原子类型或者原子类进行指定。类是为了使力场定义更加紧凑而存在的。如果有必要,可以基于原子类型定义一切。但是当许多类型共享相同的参数时,只需要指定一次就行了。
残基模板
类型通过残基匹配模板被绑定到原子上。一个模板指定了一系列原子、他们的类型及成键关系。对于PDB文件中的每个残基,力场将会搜寻残基列表来找到与之对应的残基模板。当匹配到模板时,无论是原子的顺序或者命名都不会对后续操作产生影响;只需要关注他们的元素和成键设置。
力
一旦力场定义了原子类型以及残基模板,他必须定义其力场参数。该过程通常涉及到添加每个力对象的XML文件到系统中。对于每个力的添加流程是不同的,但都包含添加基于成键和原子类型的相互作用关系的规则。举个例子,添加简谐成键力,力场将会循环成键原子对,检查他们的类型和类,验证是否匹配规则。如果匹配,下一步将调用addBond()添加简谐成键力。如果没有匹配,将会忽略当前原子对并进入下一循环。
编写XML文件
XML文件的根元素必须是<ForceFiled>标签:
1 | <ForceFiled> |
<ForceFiled>标签内包含如下的子标签:
<AtomTypes:原子类型定义<Residues:残基模板定义<Patches:optionally,补丁定义- 0或多个标签定义特殊的力
标签的顺序可以随意摆放。
<AtomTypes>
原子定义如下:
1 | <AtomTypes> |
每个原子类型有一个<Type>。其指定了类型名称,所属的类,元素符号和原子质量。类型名可以是任意字符串:不一定是数字。唯一需要确保的是:所有的类型都必须指定位置的名称。类也是任意字符串,通常不是唯一的。如果两个原子类型属于同一类,则他们的class相同。
<Residues>
1 | <Residues> |
每个<Residue>对应一个残基模板,多个<Residue>组成<Residues>。一个<Residue>包含如下标签:
<Atom>:定义残基中的每个原子名和原子类型<Bond>:定义成键的原子对。atomName1和atomName2指定了成键原子名。(某些旧力场字段使用替代标签indexfrom和to指定原子而不是名称来指定原子。目前openmm仍然支持向后兼容性,但是建议按名称指定原子,因为它使残基定义更容易理解。)<ExternalBond>:每个原子的<ExternalBond>标签指定与另一个残基的原子成键。
<Residue>标签也包含<VirtualSite>标签:
1 | <Residue name="HOH"> |
每个<VirtualSite>标签指定残基中的一个原子被虚拟位点代替。The type attribute may equal "average2", "average3", "outOfPlane", or "localCoords", which correspond to the TwoParticleAverageSite, ThreeParticleAverageSite, OutOfPlaneSite, and LocalCoordinatesSite classes respectively. The siteName attribute gives the name of the atom to represent with a virtual site. The atoms it is calculated based on are specified by atomName1, atomName2, etc. (Some old force fields use the deprecated tags index, atom1, atom2, etc. to refer to them by index instead of name.)
The remaining attributes are specific to the virtual site class, and specify the parameters for calculating the site position. For a TwoParticleAverageSite, they are weight1 and weight2. For a ThreeParticleAverageSite, they are weight1, weight2, and weight3. For an OutOfPlaneSite, they are weight12, weight13, and weightCross. For a LocalCoordinatesSite, they are p1, p2, and p3 (giving the x, y, and z coordinates of the site position in the local coordinate system), and wo1, wx1, wy1, wo2, wx2, wy2, … (giving the weights for computing the origin, x axis, and y axis)
<Patches>
patch 是修改残基模板需遵循规则的集合。举个例子,末端残疾与处于链中间的残基有轻微的不一样。力场能够定义多个氨基酸残基模板(标准、N-端、C-端、单体)。但是,由于对所有氨基酸的修改都是相同的,因此仅包括标准氨基酸模板,再加上一组用于修改末端残基的patch(也可以称为修改规则)是方便易用的。
1 | <Patches> |
每个<Patch>包含如下的标签:
<AddAtom>:添加原子到模板,指定原子名及类型<ChangeAtom>:修改模板中存在的原子类型。指定原子名以及新的原子类型<RemoveAtom>:从模板中移除原子。指定移除原子名<AddBond>:添加成键。指定两个成键原子名<RemoveBond>:移除模板中已经存在的成键。指定成键的两个原子名<AddExternalBond>:添加新的external键,指定成键原子名<RemoveExternalBond>:移除已存在的external 键,指定成键原子名
定义了patches之后,需要指定应用于那个残基模板。有两种方法达到此效果。最普遍的方法是让每个模板识别可以应用于他的补丁,使用<AllowPatch>:
1 | <Residue name="ALA"> |
另一个方式是在patch中定义可用于哪个残基。使用<AllowToResidue:
1 | <Patch name="NTER"> |
一个patch可同时修改多个模板。对于创建分子之间的成键,判断两个残基之间的成键原子类型是很有用的。创建一个多残基patch,添加residue到<Pathch>标签指定修改的残基。
1 | <Patch name="Disulfide" residues="2"> |
上述代码解释:patch修改相同类型的残基cys。每个<ApplyToResidue>标签指定修改的残基。相似的,如果残基模板包括<AcceptPatch>,则必须指定patch名以及残基的index<AllowPatch name="Disulfide:1"/>
Missing residue templates
Caution:
该功能处于实验室阶段
可以使用__getUnmatchedResidues()__方法获得当前topol文件中未包含在残基模板库中的残基
1 | pdb = PDBFile('input.pdb') |
此方法对于预处理系统,以及debug 残基模板定义和查询需要参数化得残基是很有必要的。
可以使用**generateTemplatesForUnmatchedResidues()**方法获得残基以及空残基模板,近一步可以用于参数化新的残基。
1 | pdb = PDBFile('input.pdb') |
如果发现匹配错了残基模板,可以使用**getMatchingTemplates()**函数确认怕匹配的残基。
1 | pdb = PDBFile('input.pdb') |
<HarmonicBondForce>
使用如下命令添加HarmonicBondForce到体系:
1 | <HarmonicBondForce> |
每个<Bond>定义了创建原子间简谐键相互作用得规则。每个标签通过类型(type1,type2)或者类(class1,class2)指定原子。对于每对成键原子,力场自动搜寻匹配该原子类/类型的规则。如果查找到了规则,将会调用callBond()施加特定参数的HarmonicBondForce。length是平衡键长(nm), k 是弹性常数(kJ/mol/nm2).
<HarmonicAngleForce>
1 | <HarmonicAngleForce> |
每个Angle指定对三个原子形成的键角施加简谐势的规则。每个标签需要制定原子(制定规则同上)。力场自动搜寻匹配该原子类/类型的规则。如果查找到了规则,将会调用callAngle()施加特定参数的HarmonicAngleForce。angle是弧度制的平衡键角,k是弹性常数(kJ/mol/radian2)
<PeriodicTorsionForce>
1 | <PeriodicTorsionForce> |
每个子标签定义了四个原子之间周期性扭转相互作用的规则。每个标签可以通过类(class1,class2,…)或者类型(type1,type2,…)定义原子。
力场将会识别两个不同类型的旋转:proper 和 improper。Proper torsion包含四个原子(以一定规则成键:1-2,2-3,3-4). Impropertorsion 包含一个中心原子,另外三个原子与中心原子成键,即原子2,3,4均与原子1成键。力场首先识别系统中属于不同原子类型的原子集合。对于每个原子,力场将会搜寻系统原子类型或者原子类来匹配这四个原子。然后调用addTorsion()施加PeriodicTorsionForce。反之,将会忽略该集合。 periodicity1为torsion的周期。phase1为弧度制的角度偏移。k1为力常数(kJ/mol)。
每个torsion定义能够指定多个周期性torsion项,并作用到原子上。如果需要添加第二个,只需要添加三个关键词即可。periodicity2, phase2, 和 k2。可以定义无穷多个项。如下的例子添加了三个作用项到原子上:
1 | <Proper class1="CT" class2="CT" class3="CT" class4="CT" |
也可以使用通配符定义torsion。只需要保留空的原子类型和原子类。这将使得该torsion匹配到任意原子。举个例子,如下定义将会匹配到满足第二个原子类为OS,第三个原子类为P的条件集合的任意序列原子:
1 | <Proper class1="" class2="OS" class3="P" class4="" periodicity1="3" phase1="0.0" k1="1.046"/> |
<PeriodicTorsionForce>也支持ordering属性。可以更好的兼容不同模拟软件中impropers的定义方式。
ordering="default":默认ordering="amber":使用amber格式ordering="charmm":使用charmm格式ordering=smirnoff:allows multiple impropers to be added using exact matching to replicate the beheavior of SMIRNOFF impropers
<RBTorsionForce>
1 | <RBTorsionForce> |
每个子标签定义了创建 四个原子间Ryckaert-Bellemans torsion interactions 的规则。同样,每个标签可以指定原子的类型或者原子类(typei,classi)。
力场会识别两个不同类型的扭转角:proper以及improper。其定义规则同前所述。c0到c5是 Ryckaert-Bellemans力表达式的相关系数。
也可以使用通配符定义torsions。
1 | <Proper class1="" class2="OS" class3="P" class4="" c0="2.439272" c1="4.807416" c2="-0.8368" c3="-6.409888" c4="0" c5="0" /> |
<CMAPTorsionForce>
1 | <CMAPTorsionForce> |
每个<MAP>标签定义了一个能量校正映射。其为能量值的列表(unit: kJ/mol),以一定的顺序排列并以空格分割。Map的大小取决于能量值数量。
每个<Torsion>标签定义了创建五个原子间CMAP 扭转相互作用的规则。可通过原子类或者原子类型指定原子。力场识别原子集合中的五个原子并指定成键:1-2,2-3,3-4,4-5。第一个扭转角为1-2-3-4,第二个扭转角为2-3-4-5。map指定需要使用的map index,默认从0开始。
1 | <Torsion map="0" class1="" class2="CT" class3="C" class4="N" class5=""/> |
<NonbondedForce>
1 | <NonbondedForce coulomb14scale="0.833333" lj14scale="0.5"> |
<NonbondedForce>标签有两个属性coulomb14scale和lj14scale其指定由三个键分隔的原子对之间的放缩因子。在设置了所有原子的非键参数之后,力场将会调用 createExceptionsFromBonds()设置非间相互作用力。
每个原子标签指定了一个原子类型或原子类的非键参数。两种方法混用是合适的。但是,必须要确保为每种原子类型定义了唯一的参数集。charge代表电荷;sigma: nm;epsilon: kJ/mol
<GBSAOBCForce>
1 | <GBSAOBCForce> |
每个<Atom>标签指定一个原子类型或者原子类的OBC参数。其他参数设置及注意事项同上。radius为GBSA半径(nm);scale为OBC缩放因子。
以下均为自定义参数,不过多翻译,详情见官网
<CustomBondForce>
1 | <CustomBondForce energy="scale*k*(r-r0)^2"> |
The energy expression for the CustomBondForce is specified by the energy attribute. This is a mathematical expression that gives the energy of each bond as a function of its length r. It also may depend on an arbitrary list of global or per-bond parameters. Use a <GlobalParameter> tag to define a global parameter, and a <PerBondParameter> tag to define a per-bond parameter.
Every <Bond> tag defines a rule for creating custom bond interactions between atoms. Each tag may identify the atoms either by type (using the attributes type1 and type2) or by class (using the attributes class1 and class2). For every pair of bonded atoms, the force field searches for a rule whose atom types or atom classes match the two atoms. If it finds one, it calls addBond() on the CustomBondForce. Otherwise, it ignores that pair and continues. The remaining attributes are the values to use for the per-bond parameters. All per-bond parameters must be specified for every <Bond> tag, and the attribute name must match the name of the parameter. For instance, if there is a per-bond parameter with the name “k”, then every <Bond> tag must include an attribute called k.
<CustomAngleForce>
1 | <CustomAngleForce energy="scale*k*(theta-theta0)^2"> |
<CustomTorsionForce>
1 | <CustomTorsionForce energy="scale*k*(1+cos(per*theta-phase))"> |
<CustomNonbondedForce>
1 | <CustomNonbondedForce energy="scale*epsilon1*epsilon2*((sigma1+sigma2)/r)^12" bondCutoff="3"> |
<CustomGBForce>
1 | <CustomGBForce> |
<CustomHbondForce>
1 | <CustomHbondForce particlesPerDonor="3" particlesPerAcceptor="2" bondCutoff="2" |
<CustomManyParticleForce>
1 | <CustomManyParticleForce particlesPerSet="3" permutationMode="UniqueCentralParticle" |
编写自定义表达式
以上自定义的力包含用户自定义的代数表达式。该表达式为字符串类型,很多包含标准算符和数学公式。
目前支持以下算符:+, -, *, /, ^, ( 和 ) 用于分组。
同时包含下面的数学计算函数:sqrt, exp, log, sin, cos, sec, csc, tan, cot, asin, acos, atan, sinh, cosh, tanh, erf, erfc, min, max, abs, floor, ceil, step, delta, select。
数字可以以小数或指数形式输出。实例:5,-3.1,1e6, 3.12e-2
界定符;a^2+a*b+b^2; a=a1+a2; b=b1+b2 == (a1+a2)^2+(a1+a2)*(b1+b2)+(b1+b2)^2
列表
一些力定义,例如 CustomNonbondedForce 和 CustomGBForce,允许定义列表。
如何定义一个列表函数,在<CustomNonbondedForce> or <CustomGBForce> 标签中包含<Function>标签。
1 | <Function name="myfn" type="Continuous1D" min="-5" max="5"> |
Function标签内的属性定义了函数的名字,函数的类型,值的范围。 所需的数据集取决于函数类型。
| Type | Required Attributes |
|---|---|
| Continuous1D | min, max |
| Continuous2D | xmin, ymin, xmax, ymax, xsize, ysize |
| Continuous3D | xmin, ymin, zmin, xmax, ymax, zmax, xsize, ysize, zsize |
| Discrete1D | |
| Discrete2D | xsize, ysize |
| Discrete3D | xsize, ysize, zsize |
- “ min”和“ max”属性定义了连续函数的自变量的范围。
- “size”属性沿每个轴定义了表的大小。
- 列表值在标签主体内部列出,连续值由白空间隔开。
残基模板参数
在力定义中,使用<Atom>标签为原子类型或者类定义参数。在此,还可以使用替代机制:在残基模板中定义参数值。这对于在某些力场来说是有用的。举个例子, NonbondedForce and GBSAOBCForce 都有charge属性,如果每次都需要定义每个原子类型的电荷,使用模板可以更加便利和避免bugs。诚然,很多力场对于每个原子类型都有不同的电荷,但是LJ参数对于每个原子类中的类型来说是一样的。
当构建残基模板时,你可以添加任意的属性到<Atom>标签内。
1 | <Atom name="CA" type="53" charge="0.0381"/> |
当编写力标签时,你可以在其中内含一个 <UseAttributeFromResidue>标签。此举表示可以从残基模板读取指定的属性。
1 | <NonbondedForce coulomb14scale="0.833333" lj14scale="0.5"> |
注意,charge属性消失了,该参数在class中定义,而非type。这意味着sigma和epsilon只需要在每个类中定义。原子电荷从残基模板中读取。
引用其他文件
有时需要将一个力场定义分为多个文件,但是仍然能够通过只指定一个文件来调用力场。可以使用Include标签来实现上述功能。
1 | <ForceField> |
file属性给出文件路径。
使用多个文件
当创建力场时指定了多个xml文件,他们的定义由以下的组合:
- 文件可以参考其定义的原子类型和类,以及先前文件中定义的原子类型和类。它可能不参考以后文件中定义的。这意味着在调用ForceField构造函数时列出文件的顺序可能具有重要意义。
- 涉及每个原子参数的力(例如非键合或GBSAOBCFORCE)需要为每种原子类型定义参数值。定义了哪种文件的定义并不重要。定义显式水模型的文件通常定义了少量的原子类型以及这些类型的非键参数。相反,定义隐式溶剂模型的文件并未定义任何新的原子类型,而是为主力字段文件中定义的所有原子类型提供参数。
- 对于其他力,文件有效地独立。例如,如果每个文件每个都包含a 标签,则将根据第一个文件中的规则创建债券,然后将根据第二文件中的规则创建更多债券。这意味着您可能最终会在一对原子之间获得多个键
扩展力场
开发者将力场类定义为模块化和可扩展的。这意味着可以对全新力类型的支持,例如使用插件扩展。
添加新的力类型
对于每个力类,都有一个生成器解释XML标签,然后创建力对象并将其添加到系统中。力场将标签名称与生成类进行映射。当创建了力场,他将扫描XML文件,为每个标签寻找生成类,并要求该类基于它创建生成器对象。然后,当你调用createSystem()时,他会循环到每个生成器上,并创建每个力对象。
生成类必须定义两个方法。首先,需要一个静态方法解析XML标签并创建生成器
1 | @staticmethod |
element是XML标签,forcefield是创建的力场。该方法应该创建一个生成器并将其添加到力场中。
1 | generator = MyForceGenerator() |
It then should parse the information contained in the XML tag and configure the generator based on it.
Second, it must define a method with the following signature:
1 | def createForce(self, system, data, nonbondedMethod, nonbondedCutoff, args): |
When createSystem() is called on the ForceField, it first creates the System object, then loops over each of its generators and calls createForce() on each one. This method should create the Force object and add it to the System. data is a ForceField._SystemData object containing information about the System being created (atom types, bonds, angles, etc.), system is the System object, and the remaining arguments are values that were passed to createSystem(). To get a better idea of how this works, look at the existing generator classes in forcefield.py.
The generator class may optionally also define a method with the following signature:
1 | def postprocessSystem(self, system, data, args): |
If this method exists, it will be called after all Forces have been created. This gives generators a chance to make additional changes to the System.
Finally, you need to register your class by adding it to ForceField’s map:
1 | forcefield.parsers['MyForce'] = MyForceGenerator.parseElement |
The key is the XML tag name, and the value is the static method to use for parsing it.
Now you can simply create a ForceField object as usual. If an XML file contains a <MyForce> tag, it will be recognized and processed correctly.
Adding residue template generators
experimental